
Header

 photo newheader_zps66c52807.png
Image Map
Showing posts with label kids. Show all posts

Sunday, January 26, 2014

Yoplait Greek Yogurt #TasteOff

Today's #TasteOff was sponsored by Yoplait, but the winner was my honest choice.

We took the Yoplait Greek Taste Off challenge, have you?

Yoplait Greek Taste-off #sponsored

If you would like to take the challenge visit this link: Greek TasteOff Tumblr;  to snag a coupon!

Greek yogurt is part of our daily diet. It is a great source of protein to help keep your waistline trim. Most of the time, I prefer plain or vanilla (I know, not too exciting!). My husband and our youngest are the only other yogurt lovers in the house, and they enjoy yogurt with fruit in it.  I like it sometimes, but generally stick to my old stand-by.


We buy all brands, Chobani, Fage, Activia, but we had not tried Yoplait's Greek. Really, there are getting to be more and more Greek choices, all the time.  I have tried some that I will definitely not purchase again.

When I was contacted by Yoplait to participate in the Yoplait Taste-Off, I was thrilled! Like I said, we love yogurt.  I use it in smoothies, fruit salads, and I use plain in all sorts of recipes. So we headed off to the store to grab our yogurt to get tasting. 


Yoplait Greek Taste-off #sponsored

I set up the taste test and labeled the bowls of yogurt, to keep them straight! They both looked pretty yummy, but one of them was a clear stand out.

Yoplait Greek Taste-off #sponsored


This challenge is Yoplait vs. Chobani and, honestly, I love Chobani Greek yogurt, so I was a little skeptical. (I really love their Coconut yogurt! Yum!)

My youngest was my taster because I knew that he would be completely honest with me.

Yoplait Greek Taste-off #sponsored

Who was the standout winner?

Yoplait Greek Taste-off #sponsored

I was, truly, so surprised! The Yoplait Greek Blueberry is already blended and was creamy with a smooth taste, no bitterness like some Greek yogurt.  The Chobani is fruit on the bottom, so you have to stir quite a bit to get it blended, and it was still not nearly as smooth as I would like.  And, Chobani, even though it's been one of my favorites in the past, really does have the "bite" that many Greek yogurts have.

I was absolutely convinced. Yoplait Greek Yogurt has a new home in my refrigerator! 


Yoplait Greek Taste Off #sponsored


Yoplait Greek Yogurt has no artificial sweeteners or flavors, and all colors are natural with real bits of fruit in every cup. Yoplait Greek is available nationally, and you can use the store locator right on their website to find your nearest retailer.

And, oh, the flavors! There are some really good ones, that I still want to try.  Blueberry is always in our fridge, but I really want to try the Coconut and the Strawberry Raspberry. Those just sound tasty, don't they? There more flavors, too, like Cherry, Pineapple, my trusty Vanilla, Tangerine, Strawberry, and Raspberry. Yum! I'm craving them now.

Yoplait Greek Taste-off #sponsored

Join in the Taste-Off now and go to the Greek Taste-Off Tumblr Page to snag a coupon on your next purchase of Yoplait Greek and tell them what you think.

Try the better tasting Greek! In a national taste test, Yoplait® Greek Blueberry Beat Chobani® Blueberry Fruit On The Bottom.

Tuesday, January 7, 2014

Tips & Tricks: Favorite 2013 Posts

Are you ready for a brand new line up of Tips & Tricks Linky Parties?

We have some great ones lined up and I know you won't want to miss out on a single one. 


With 13 blogs participating, you'll get plenty of exposure.  Tell your friends and please share your links on your preferred social media platform.

This week, we are looking for your Favorite Posts of 2013! Isn't that fun! Any post you had that got you a lot of traffic, or one that you loved but maybe needs a little lovin', link it up below.  But, no worries, if you want to link up anything else, there is always the Anything Goes section, too. 

Last week’s most pinned post was:

Every link is pinned to Pinterest (you can see last week’s board, here) and shared on a random social media site by one or several of our cohosts.  Rest easy – you’re getting lots of attention from linking to Tips & Tricks!
So, be sure to follow your cohosts, so that you don’t miss your shout out!


Anything Goes:


Monday, November 18, 2013

Weekend DIY: Boy's Bedroom Makeover


We had a great weekend! I hope you did, too.  

Any time that we do some DIY I have a great time.  You know how it is.  

This weekend the project was less than $100, and we made over a whole room.  

Yes! Less than $100! Crazy, right?

It was maybe more of a mini makeover, but it made a dramatic difference in the younger boy's bedroom.  

Let me refresh your memory on the before sitch:


We had the bunkbed happenin' and they stayed a major mess. They were hard to make up, and they stayed piled with junk all the time.


There was just TOO MUCH STUFF to really be able to make the room look neat, and not nearly enough storage. 


Awesome signs were just stuck in corners where they didn't really stand out.


I made the Drop Cloth Cockpit (which the Littlest loved), but it just encourage more piling of junk behind the flap.

So, there were lots of problems that needed to be solved.

1. De-crapify the entire room
2. Make the beds more user friendly for the actual users. The Middle-un is 13 now, and he is tired of climbing up into bed every night.
3. Curtains!
4. Organization after de-crapification.

We were in project mode when we got up on Saturday morning.  Even with grocery shopping and a birthday party on the to-do list, we were determined to get it done. 

And, much to his chagrin, the Littlest had to help out with the de-crapifying. It's mostly his junk anyway, so he should have a say in what stays and what goes (with me having the ultimate authority, of course). He did great! He was ready to donate lots of things that he wasn't ready to let go of just a couple of months ago. We were even able to toss lots of McDonald's toys. Yea!

We would never throw away books, but we are donating a ton of them.  Both of the boys that share this room are readers, so we are always going to need more room for new books.  

Then, we un-stacked the bunk bed for easier access for the Middle-un. He had been saying that it was getting harder and harder to climb up with out waking his brother up. Problem solved.

Since we un-stacked the beds we had to reconfigure their storage in the corner of the room.  There were two corner units that we took out completely, and just shifted the dressers and hutches around.  

Now for the ridiculous number of pictures with more explanations. 

Airplane themed boys room

This is what the beds look like un-stacked.  Notice how the posts on one bed come up higher? I don't really care.  I doubt most people would even notice it!


I kept the same bedding and shifted the plane wall art to the middle of the wall.  We added the C's above each bed with reading lamps mounted beneath.


So far, we have spent $22 dollars on the lamps.  Everything else we already had.


Airplane themed boys room

We moved the map that was thumbtacked to the wall down a bit, and used pine boards to frame it out.  We simply nailed them to the wall, securing the map beneath.

The boards were about $13 at Lowes. 

Total, so far, $35.

Airplane themed boys room


You can see that we moved the propeller to wall with the window, and now you can see the prop from the hallway, which I like. There were no curtains in the room, so I bought a rod and a single flat white sheet at WalMart. I simply ripped the sheet down the middle and hung each half with clips, folding in the rough edge. 

The rod was about $14, and the sheet was $10. Now we are up to a whopping $59!

Airplane themed boys room

We took one of the hutches off and it's now being used between the beds as a stand alone shelf. We moved the dressers to be side by side, and relocated the Charter sign to this wall. Eventually, a small tv will reside where the globe is sitting.

I bought a few more fabric bins (which are empty right now!), they were only $4 each and got 3. 

$59 + $12 = $71

That's the total! 
I know that it's not a complete makeover, but it really makes such a difference in the room.  It feels so much bigger without the everything being so high in the room.  The bunks were up high, and the wall units were massive in the corner.  Now it feels much more spacious and more suitable for older boys.  

We were able to store all the Littlest' Legos in bins that he can slide under his bed. And, now we are working on putting away bins before getting out something else.  

Since we finished, he has spent a lot of time in here.  He loves his reading lamp, and the signs above the beds.  The Middle'un is thrilled that he doesn't have to climb anymore.

Over all, it's a big hit. And, we didn't break the bank or our backs.

Note: The wall color looks absolutely awful in the pictures! It's really not that green. It's more of a khaki color. 

What room do you need to give a good de-crapifying to?

Monday, November 4, 2013

Wrapping Up my Family Series

Being in bed for a week with the flu really messed up my schedule!

I am going to wrap up the Family series this week with two more posts.  

Today, I am introducing my other sister, Lisa.  She's the one we call Sis.  

She is the heart of our family.  If there is something to shed tears about she will be the first one.  At times you may hear, "Is Sis crying again?"

Yep, that's her.  Tenderhearted.

I grew up in a blended family and I was the "ours" of the bunch. I was showered with attention constantly. And, both my sisters were like extra moms that I got to have.  

If you remember, my oldest sister got married when I was 5 and she stuck her tongue out at me through the whole wedding. 

Well, that left me and Sis at home. We fought like crazy part of the time, and laughed, and then fought some more. 

She got married when I was 14, and I don't think I talked to her for a week.  I was so mad. 
She left me!

She will do anything for anyone that needs it, and she's always there when I need her. 

Here's my Sis.

In this fab '90's pic, Sis is on the left.


************************************************************

Well, when Nan ask my to write something about family I thought where would I start. So I decided what better place to start than where I came from. Not literally where I came from but how I came to be me. You see I was born in March of 1963 but I remember very little about that time in my life.   I had a wonderful momma that loved me very much. A brother that would let me play with his model cars until I would break the steering wheel or pop a tire off. An older sister to whom played endless hours  of dolls, house and anything else she said (she's the bossy one).

My real life began in March of 1968 when I was "born" into my extended family. With my new family came two older brothers and the most amazing daddy. My daddy loved me unconditionally from the start. Why this man would be willing to take on four more mouths to feed is only by Gods amazing grace. My other two brothers were here with us a lot. One lived with us for quiet some time. 

My daddy was such a sweet gentle man. I'm sure it happened more then this but I only remember him getting on to me two times. Once because Lolo ( the bossy one ) and I would not stop laughing one night while trying to go to sleep. He simply said GIRLS and we knew he meant business. The other time I came home from Longview after dark in the rain one night and he let me know that wasn't the thing to do. Daddy loved me just the way I was. 

To the bunch we added a little sister. With her came endless hours of dressing Barbie's over and over and over. As we got older I learned to sew and crochet from my grandmother Aunt Birdie. I used my new found skills to make my baby sister some clothes. Halter tops was my specialty, and yes she actually wore them outside the house. 

Mom held it all together. From Saturday perms, making uniforms for three girls in Tiger Dolls, cooking meal after meal. She taught us to be good do right and remember where you came from.   Love is what we do. You will always hear us say I Love You even if we are only be gone for a minute. 

Family comes in many forms so no matter how you were "born" into yours they are still a blessing from God. I love you all and I love you Nan for reminding us what family is all about.

**************************************************************************************

Our family is very close. I know other families are, too. But, to me, we really have something special.

From, Mom and Daddy, brothers and sisters, nieces and nephews, cousins that I know are reading this, and my own family at home,  I love you all. 

You have made me, ME!

Sunday, October 27, 2013

A Fun and Spooky Halloween Gathering

The last few years we have made it a tradition to have friends over on Halloween.  
Our neighborhood is a great place for trick or treating and a big group of kids and adults will make their way from house to house, while some of us stay and pass out the candy to all the cute kiddos coming by. 

Usually, we just have a few snacks and drinks, while enjoying our time together. But, this year, I want to kick it up a notch and do something a little more special. 

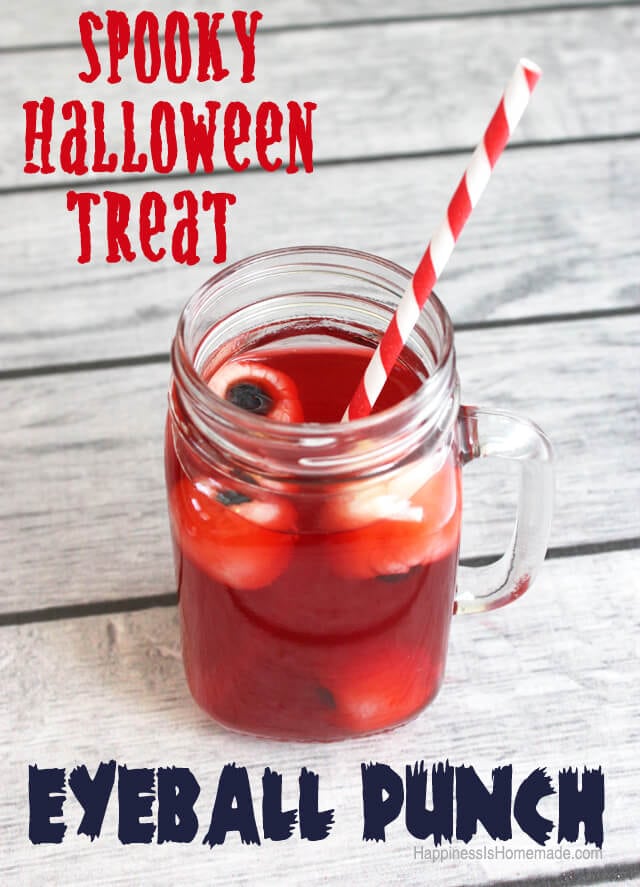
Happiness is Homemade-Spooky punch
Spooky Eyeball Punch-Happiness is Homemade

I really love this Spooky Eyeball Punch from Happiness is Homemade.  It is super easy and looks so fun.  Imagine a whole punch bowl full of those creepy eyeballs! 

The Graveyard Cupcakes that are in the same post as above, are too cute, and look pretty easy, as well. 

Dracula Dentures via PopSugar

These Dracula Dentures only take 4 ingredients and don't you know that the kids would love them! They are scarily cute!

No Halloween Party would be complete without a mummy or two.

Mummy Oreos from Queen Latifah

These Oreo Mummies just look tasty and don't look like they would take much time.  That's what I'm all about; quick and easy, but too cute. 

Funny Bones from Spoonful
I love the combination of sweet and salty and these Funny Bones use chocolate and pretzels, along with marshmallows.  Yes, please.

Of course, you can't just have sweets around. You need something else for all those who don't love chocolate and candy (although, personally, I think there is something wrong with those people). 

Mummy Dogs from licouponqueen
Pigs in a Blanket are one of my family's favorites, and these Mummy Dogs go right long with the spooky theme. They are easy to make and sure to be a hit. 

When everyone has had their fill of spooky fun, I want to send the kiddos home with an extra special treat.  These Hand Halloween Party Favors would top off the fun nicely!

Halloween Hand Party Favors
Even one or two of these fun treats would make the night special.  Being with friends and spending time together is what makes it so much fun.  

What treat are you looking forward to making for a spooky Halloween gathering?

Wednesday, October 9, 2013

THE Pin It Party #26!

Welcome to THE 26th week of THE Pin It Party!

Please take a second to update your THE Pin It Party button! You can either grab the code below or just link your current button to the new Creative Geekery site (www.creative-geekery.com). Thank you for taking the time to do this!

Grab button for Creative Geekery
Grab the code for our button here!
<div class="http://i1286.photobucket.com/albums/a618/CreativeGeekery/PinItParty_zps8d39e394.jpg" style="width: 150px; margin: 0 auto;">
<a href="http://www.creative-geekery.com" rel="nofollow">
<img src="http://i1286.photobucket.com/albums/a618/CreativeGeekery/PinItParty_zps8d39e394.jpg" alt="Creative Geekery" width="150" height="150" />
</a>
</div>
Have you been "pinned" at one of our TWENTY FIVE parties? If you can't remember, be sure to check our THE Pin It Party - The Best of the Best Pinterest board. We have a surprise for you! Go here to grab a special badge I made just for you!

Are you interested in co-hosting THE Pin It Party? It is a WHOLE lot of fun and a great way to grow your Pinterest following. Go here to get more information and to reserve your spot now!
Completely Unfinished - Summer Lovey Dovey Road Trip Playlist One Organic Mama - A Robot Party What's Up with the Wilhelms - Anywhere Workout
1. Please follow the host and co-hosts on Pinterest.
2. Send out a tweet about the party! Just click here:
3. "Like" THE Pin It Party on Facebook by clicking on the button below.
4. Grab the party button above and add it to your blog's sidebar or link up party list.
5. Post 1-3 links to your blog's most "pin-able" posts from the last few weeks. (Please, no links to other parties, giveaways or shops please. If you are an ETSY shop owner, come back this weekend and link up at the Weekend Blog Block Party!)
6. Mingle! Reach out to somebody new and pin their stuff. You never know when you will meet your blogging bestie!
7. Have a FABulous day and come back next week for more Pinterest fun.
Host: Ellie @ Creative Geekery
Co-Hosts:
We will each choose our three favorite posts from the party and pin them to this party's collaborative Pinterest board: THE Pin It Party - The Best of the Best! Woot woot!


Sunday, September 29, 2013

DIY Halloween Costumes for Boys


The time is coming for getting started on any DIY Halloween Costumes that need to be created.

I haven't created many over the years, but began the tradition about two years ago.  The Littlest wanted to be Captain Jack Sparrow and none of the costumes that I saw really made me happy.  I thought I could do better! And, in my opinion, I did!

The hair was the biggest issue, of course, but I had to get it right for the costume to turn out well.  

I visited our Hancock fabric store and found some yarn that I thought would be perfect.  It was a brown variegated nubby yarn. Don't you like my technical description? This was pre-blogging days, so there aren't any pics of the yarn or the wig making process. I'll do my best to describe it.

I took 3-4 strands about 12-15 inches long that formed the center of the wig.  Then, I tied groups of 3-4 strands, about 12-15 inches in length to hang off each side of the center strand. Some of the strands I braided, and included string and even some burlap.

I added a head scarf of some stretchy red fabric from the remnant bin and a coin earring I found in an old jewelry box to complete the wig.

I created a brown vest out of felt, and made shoe covers to look like boots, as well.  

When all of that was paired with an older brothers dress shirt, a kitchen towel for a belt, and a toy pirate sword, he was all ready to go!

Here is what we came up with:

Trip Worth Taking Blog: DIY Captain jack Sparrow Costume
DIY Captain Jack Sparrow Costume

Trip Worth Taking Blog: DIY Captain jack Sparrow Costume

Close up of the wig:

Trip Worth Taking Blog: DIY Captain jack Sparrow Wig
Captain Jack would never smile in a photo!

Trip Worth Taking Blog: DIY Captain jack Sparrow Wig
Cutest pirate ever...

I have to admit that I was super excited about the way that it turned out.  And, so was the little pirate.

This year may be a bit more time intensive.  He wants to be Jack Skellington from A Nightmare Before Christmas. Eek.  I better get busy.

I was browsing Pinterest and found some really creative DIY costume ideas:

It's Uncle Si!

via Pinterest

These Minions are too cute!

via Pinterest

Steve!

via Pinterest

I've created a Pinterest board with DIY Costumes for boys.  I will be adding more to it all month!


Do you create DIY Halloween costumes? I would love for you to send me the link to be added to the Pinterest Board.  Shoot me an email to amyfenn1 @ gmail . com, or leave a link in a comment below.

Remove the spaces of course!

I can't wait to see what you've created!


Thursday, August 29, 2013

Budgeting: Bringing In Income With Consignment

Clothes, clothes, clothes and more clothes!

This pile is huge, and there are at least 2 more like it!

They don't sell at garage sales like they used to, do they?
At least, not around here. 

So, I have bags of kids clothes that I really need to get rid of....and shoes, games, and on  and on.

In the past year and half, if you have read this and this, then you know that we are on a quest to save more money which includes ways to bring in more money to add to the budget.

We have no desire to be wealthy by the world's standards, but, wealthy by our own standards.
We have a tremendously loving family and our time that we spend together is one of our top priorities, so we believe that we are rich in the love of our family and our love of Jesus.

Our desire to create a little more room in the family budget leads me to have garage sales, sell on Facebook (occasionally), and now to participate in a community consignment sale for children's clothes. The sale is the week and weekend of September 13th, and lasts for 4 days. I have heard that the crowd that comes is huge!

It is such a great way to sell your gently used children's clothes and even buy a ton of great items, as well.

We don't play these games anymore. Well, I was informed this morning that Battleship had to stay.....

The prep is a little time consuming, but I know it will be worth it.

Here is what I have to do:

Sort all the clothes by size and gender
Check them over for stains and tears and discard those
Put EVERYTHING on hangers
Pin the clothing to the hangers with safety pins
Write a description on an index card and pin the card to the item
Decide my prices
Print barcode labels from the Sale website
Apply each barcode to the index card on the correct item

For shoes/toys, they have to be put in plastic zip baggies and the index card taped to the baggie with packing tape.

Yep, lots of work.

Count 'em. Six pair of brown shoes...and, all of them are very similar. In fact, two are exactly alike!

(My name is Amy, and I have a brown shoe problem.)

I haven't ever done this sale before, but I hear it is awesome.

They hold the sale 2-3 times a year in Tyler, TX, which is only about 40 minutes from my house.

I think that they have done one in my home town, but it wasn't as well advertised.

A really good friend of mine has participated in the sale for years, and the last check that she received was for over $600. That much would certainly help out the Christmas stash!

I'm really excited to see how it goes.  I'll show off my completely prepped items when I'm done.

How do you bring in a little extra money around your house?
How about Christmas spending? Is it cash all the way?


ShareThis

Related Posts Plugin for WordPress, Blogger...