Header

 photo newheader_zps66c52807.png
Image Map
Showing posts with label home decor. Show all posts

Tuesday, January 7, 2014

Tips & Tricks: Favorite 2013 Posts

Are you ready for a brand new line up of Tips & Tricks Linky Parties?

We have some great ones lined up and I know you won't want to miss out on a single one. 


With 13 blogs participating, you'll get plenty of exposure.  Tell your friends and please share your links on your preferred social media platform.

This week, we are looking for your Favorite Posts of 2013! Isn't that fun! Any post you had that got you a lot of traffic, or one that you loved but maybe needs a little lovin', link it up below.  But, no worries, if you want to link up anything else, there is always the Anything Goes section, too. 

Last week’s most pinned post was:

Every link is pinned to Pinterest (you can see last week’s board, here) and shared on a random social media site by one or several of our cohosts.  Rest easy – you’re getting lots of attention from linking to Tips & Tricks!
So, be sure to follow your cohosts, so that you don’t miss your shout out!


Anything Goes:


Monday, January 6, 2014

New Year-New Focus


I can't believe it's already 2014.  Where did the holidays go?

You may have noticed that there haven't been any posts in a couple of weeks. Did you? Well, I took a technology break for the weeks of Christmas and New Year's. I did read some books on my Kindle, but I don't really count that.  I was just reading, after all. I think I plowed through 3 books. It was awesomesauce.

We took in a couple of movies with the little guy, too.  Walking with Dinosaurs and The Secret Life Of Walter Mitty, both of them were so good.  I highly recommend them.

And, of course, there were all of the holiday festivities. Visiting family and opening huge mounds of gifts.

Everyone was happy with their swag that they got. I especially love watching the boys faces as they open their gifts.

I really raked in the goodies, as well.  I got some things for the house, and I'll show those things off later on. But, the absolute best gift I received was a brand new dining room table built just for me by my amazing husband.

Pine Dining Table with Weathered Grey Stain
Pine Dining Table with Weathered Gray Stain

I can't even tell you how much I love it.  Well, maybe I can.  I love it. A lot. Right now there are the same 6 chairs around the table, but this weekend there will be 8.  I have two more of the same chairs that have been waiting patiently in the garage until they were called up.  I felt so sorry for them. Just hanging out in the cold garage. Poor things.

Here is the dining room before:
{Note that these pics are unedited}


These were right after we completed the kitchen renovation.  In the top pic, we didn't even have 6 chairs finished, yet. Notice in the bottom two photos that the table legs are right in front of the chair? Yea. That made for a comfy seat for a meal. NOT.  

I did move the green bench that was in front of the window in the dining room.  We needed just a tad more room for comfort. 

I will be updating the photos on the Our Home page, soon, so stay tuned. 

Also, during the month of December and the Christmas break, I started making some "lifestyle" changes for my health.  I am not an unhealthy person, but some changes did need to be made.  I have suffered with migraines all of my life, and I have an autoimmune liver condition. I have been on a lot of medication for many years, and I felt the need to change that.  Is it scary? Absolutely! 

I was able to transition off of one of my medications and I am replacing it with supplements, diet changes, better habits.  I have added Advocare products to my daily regimen, to keep me hydrated, increase intake of certain vitamins and minerals, and promote all around well being.  

I hope you'll wish me luck for success! I'll be sharing about my my migraine regimen very soon.  I know that there are many people who suffer and feel so misunderstood.  

Tomorrow is the newest installment of the Tips And Tricks Linky Party and we are hoping that you will stop by and share your favorite posts from 2013!


Monday, November 18, 2013

Weekend DIY: Boy's Bedroom Makeover


We had a great weekend! I hope you did, too.  

Any time that we do some DIY I have a great time.  You know how it is.  

This weekend the project was less than $100, and we made over a whole room.  

Yes! Less than $100! Crazy, right?

It was maybe more of a mini makeover, but it made a dramatic difference in the younger boy's bedroom.  

Let me refresh your memory on the before sitch:


We had the bunkbed happenin' and they stayed a major mess. They were hard to make up, and they stayed piled with junk all the time.


There was just TOO MUCH STUFF to really be able to make the room look neat, and not nearly enough storage. 


Awesome signs were just stuck in corners where they didn't really stand out.


I made the Drop Cloth Cockpit (which the Littlest loved), but it just encourage more piling of junk behind the flap.

So, there were lots of problems that needed to be solved.

1. De-crapify the entire room
2. Make the beds more user friendly for the actual users. The Middle-un is 13 now, and he is tired of climbing up into bed every night.
3. Curtains!
4. Organization after de-crapification.

We were in project mode when we got up on Saturday morning.  Even with grocery shopping and a birthday party on the to-do list, we were determined to get it done. 

And, much to his chagrin, the Littlest had to help out with the de-crapifying. It's mostly his junk anyway, so he should have a say in what stays and what goes (with me having the ultimate authority, of course). He did great! He was ready to donate lots of things that he wasn't ready to let go of just a couple of months ago. We were even able to toss lots of McDonald's toys. Yea!

We would never throw away books, but we are donating a ton of them.  Both of the boys that share this room are readers, so we are always going to need more room for new books.  

Then, we un-stacked the bunk bed for easier access for the Middle-un. He had been saying that it was getting harder and harder to climb up with out waking his brother up. Problem solved.

Since we un-stacked the beds we had to reconfigure their storage in the corner of the room.  There were two corner units that we took out completely, and just shifted the dressers and hutches around.  

Now for the ridiculous number of pictures with more explanations. 
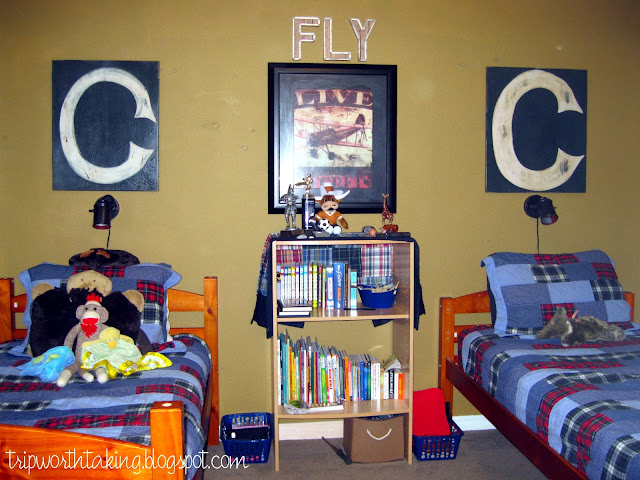
Airplane themed boys room

This is what the beds look like un-stacked.  Notice how the posts on one bed come up higher? I don't really care.  I doubt most people would even notice it!


I kept the same bedding and shifted the plane wall art to the middle of the wall.  We added the C's above each bed with reading lamps mounted beneath.


So far, we have spent $22 dollars on the lamps.  Everything else we already had.


Airplane themed boys room

We moved the map that was thumbtacked to the wall down a bit, and used pine boards to frame it out.  We simply nailed them to the wall, securing the map beneath.

The boards were about $13 at Lowes. 

Total, so far, $35.

Airplane themed boys room


You can see that we moved the propeller to wall with the window, and now you can see the prop from the hallway, which I like. There were no curtains in the room, so I bought a rod and a single flat white sheet at WalMart. I simply ripped the sheet down the middle and hung each half with clips, folding in the rough edge. 

The rod was about $14, and the sheet was $10. Now we are up to a whopping $59!

Airplane themed boys room

We took one of the hutches off and it's now being used between the beds as a stand alone shelf. We moved the dressers to be side by side, and relocated the Charter sign to this wall. Eventually, a small tv will reside where the globe is sitting.

I bought a few more fabric bins (which are empty right now!), they were only $4 each and got 3. 

$59 + $12 = $71

That's the total! 
I know that it's not a complete makeover, but it really makes such a difference in the room.  It feels so much bigger without the everything being so high in the room.  The bunks were up high, and the wall units were massive in the corner.  Now it feels much more spacious and more suitable for older boys.  

We were able to store all the Littlest' Legos in bins that he can slide under his bed. And, now we are working on putting away bins before getting out something else.  

Since we finished, he has spent a lot of time in here.  He loves his reading lamp, and the signs above the beds.  The Middle'un is thrilled that he doesn't have to climb anymore.

Over all, it's a big hit. And, we didn't break the bank or our backs.

Note: The wall color looks absolutely awful in the pictures! It's really not that green. It's more of a khaki color. 

What room do you need to give a good de-crapifying to?

Wednesday, November 13, 2013

My Favorite Christmas-y Fonts

Fonts add so much personality to any DIY artwork that you create and they add fun and and spice to invitations and greeting cards.  But, there are many holiday fonts around that are a bit over the top; covered with illustrated snow drifts, stars, ribbons, and more. 

I love the decorative fonts that are a little more understated but still interesting and different.

Here is a collection of some of my favorites that will be fun to incorporate into any of your projects for the holiday season.  

Have fun using them! I would love to know how you plan to use them!


Tuesday, November 12, 2013

Tips & Tricks: A New Link Party I'm Co-Hosting!

I am so excited to be a part of the Tips & Tricks Linky Party hosted by Stringtown Home!

There are ton of new co-hosts and you're links will be seen on 13 blogs! That's awesome, if you ask me.  

There are lots of categories to link up to, and a different theme each week.  Don't worry, if you don't have a project that fits perfectly with the theme of the week, you can post in the Anything Goes section!

Here is the schedule for the parties through the end of December:


Now  you can get ready for all the upcoming parties, mkay?

Don't forget to follow all the hosts on the social media channel of your choice-or all of them!


Whew! That's a lot of co-hosts! Isn't it exciting? Your links will appear on all 13 blogs!

Please follow your co-hosts, tweet about the party, and visit as many links as you can to discover new blogs and make new blogging friends.  Everyone wins, right?

Now, on to the linking....


Monday, November 11, 2013

Holiday Ways to Save


I love the Christmas season. Everything about it.  The cooler weather, decorating the house, gathering with friends, good food, giving (and getting) gifts.

Really, if you don't enjoy the holidays, I am not someone that you would want to be around. 

We haven't started putting up the Christmas decorations yet, but we are making plans about what we want to do the same as in the past, and what we want to change.  

We, also, start saving money for Christmas gifts during the summer, so we are doing pretty good on the gift budget.  (Now, if I can just stick to it!)

Any way that I can find to save money over the holidays is appealing to me.  I want everything to be festive and fun, without breaking the bank.  So, of course, I turn to Pinterest. Where else would I go?

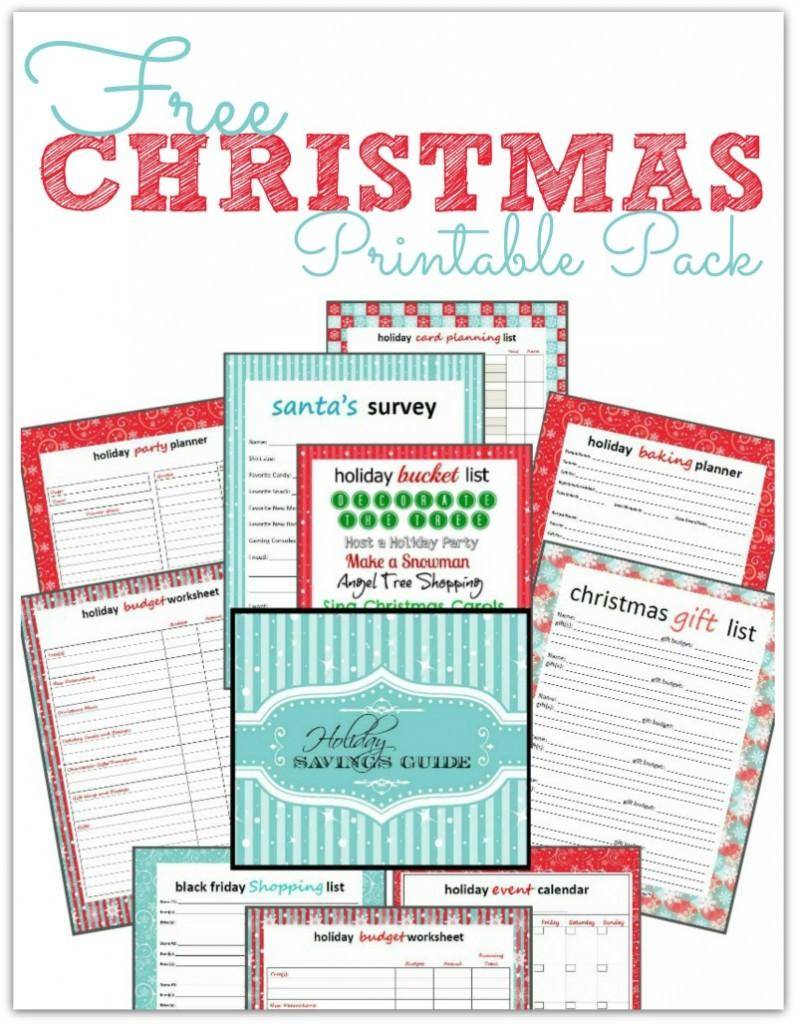
I was able to find an awesome Christmas Savings Guide that is printable from Passionforsavings.com

via passionforsavings.com

This is really genius.  There are planners for baking, parties, and cards; a budget worksheet, a gift list, a shopping list for Black Friday, and a Santa Survey for the kiddos. 

It is completely free to download when you sign up for her email updates, which are so useful!
You will get daily money saving deals right to your inbox, plus access to freebies.  Head over and get signed up!

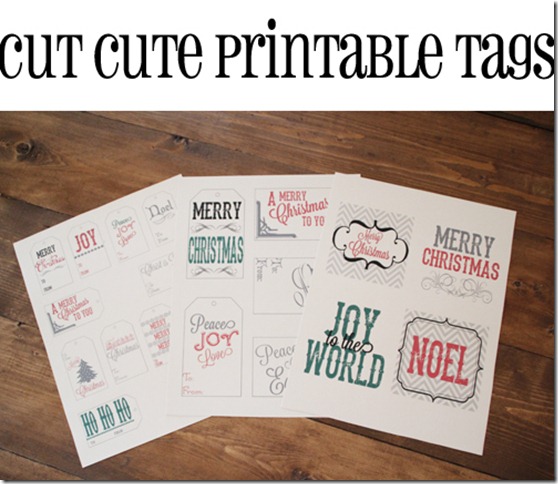
Another way that I like to save money during the Holidays is by creating my own decor and wrapping using free printables.


via Shanty-2-Chic

It makes so much more sense to make your own tags. You can get exactly what you want in the number you need.  For years, I had half used sheets of those sticker tags left after Christmas, and didn't want to use the same ones the next year!

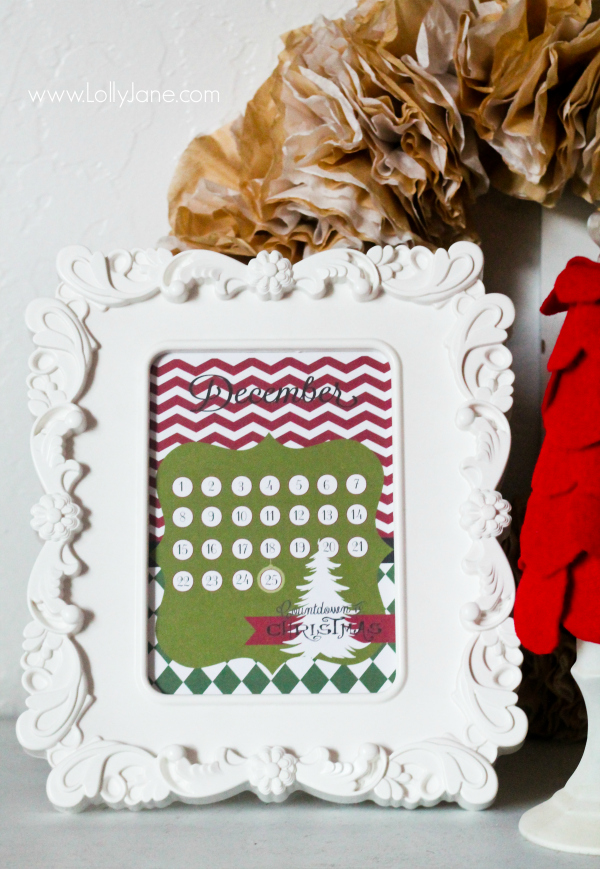
This precious Christmas Countdown is available over at The Crafting Chicks, and would definitely add to the excitement for little ones and big ones alike!

via The Crafting Chicks

Collections of freebies are always fun to browse, and Pretty Providence gathered a list of 50 printables of types last year.  There tags, cards, cupcake wrappers, and prints to frame.  Head over and check out her list!

via Pretty Providence
These are all great ways to get you thinking about different ways to save money during the holidays.  And, creating items at home is one of the very best way to do it.  And, when you create your own decor and wrapping, you can really put your own personal stamp on your Holiday season.

Do you have printables and other ideas to share? Tell me in the comments!


Tuesday, October 22, 2013

My Fall Centerpiece

I love to add fun fall touches throughout the house for the whole season.  Even though it doesn't really feel like fall until well into October.  Now, the cool weather is finally here and I'm loving it. 

I was walking in the yard one day after a storm the previous night and there were a few branches down in the yard, and I knew I had to bring them inside. 

Fall Branch Centerpiece

I love the way they look in the vintage milk jug. At first, I just had the bare branches, then I knew I had to do more.  I cut out leaves from my stockpile of scrapbook paper and taped them on. 

It's really huge!


It reaches up and around the light fixture, so they sort of mingle together nicely.


The vintage Borden milk jug is one that my Daddy gave to me.  I have no idea how old it is.

And, who says that glass balls are only for Christmas? 


What have you created with scrapbook paper for the fall?

Have you brought nature inside your home for the season?

Thursday, October 17, 2013

THE Pin It Party #27

I'm so sorry that this is so late going up! I have really been out of it with this flu.

Get your links posted so that you can get pinned!

Welcome to THE 27th week of THE Pin It Party Link Up!

Please take a second to update your THE Pin It Party button! You can either grab the code below or just link your current button to the new Creative Geekery site (www.creative-geekery.com). Thank you for taking the time to do this!

Grab button for Creative Geekery
Grab the code for our button here!
<div class="http://i1286.photobucket.com/albums/a618/CreativeGeekery/PinItParty_zps8d39e394.jpg" style="width: 150px; margin: 0 auto;">
<a href="http://www.creative-geekery.com" rel="nofollow">
<img src="http://i1286.photobucket.com/albums/a618/CreativeGeekery/PinItParty_zps8d39e394.jpg" alt="Creative Geekery" width="150" height="150" />
</a>
</div>
Have you been "pinned" at one of our TWENTY FIVE parties? If you can't remember, be sure to check our THE Pin It Party - The Best of the Best Pinterest board. We have a surprise for you! Go here to grab a special badge Ellie made just for you!

Are you interested in co-hosting THE Pin It Party? It is a WHOLE lot of fun and a great way to grow your Pinterest following. Go here to get more information and to reserve your spot now!
RULES
Completely Unfinished - Summer Lovey Dovey Road Trip Playlist One Organic Mama - A Robot Party What's Up with the Wilhelms - Anywhere Workout

1. Please follow the host and co-hosts on Pinterest.

2. Send out a tweet about the party! Just click here:

3. "Like" THE Pin It Party on Facebook by clicking on the button below.

4. Grab the party button above and add it to your blog's sidebar or link up party list.

5. Post 1-3 links to your blog's most "pin-able" posts from the last few weeks. (Please, no links to other parties, giveaways or shops please. If you are an ETSY shop owner, come back this weekend and link up at the Weekend Blog Block Party!)

6. Mingle! Reach out to somebody new and pin their stuff. You never know when you will meet your blogging bestie!

7. Have a FABulous day and come back next week for more Pinterest fun.

Host: Ellie @ Creative Geekery
Co-Hosts:
Kristin @ One Organic Mama
We will each choose our three favorite posts from the party and pin them to this party's collaborative Pinterest board: THE Pin It Party - The Best of the Best! Woot woot!


Wednesday, October 9, 2013

THE Pin It Party #26!

Welcome to THE 26th week of THE Pin It Party!

Please take a second to update your THE Pin It Party button! You can either grab the code below or just link your current button to the new Creative Geekery site (www.creative-geekery.com). Thank you for taking the time to do this!

Grab button for Creative Geekery
Grab the code for our button here!
<div class="http://i1286.photobucket.com/albums/a618/CreativeGeekery/PinItParty_zps8d39e394.jpg" style="width: 150px; margin: 0 auto;">
<a href="http://www.creative-geekery.com" rel="nofollow">
<img src="http://i1286.photobucket.com/albums/a618/CreativeGeekery/PinItParty_zps8d39e394.jpg" alt="Creative Geekery" width="150" height="150" />
</a>
</div>
Have you been "pinned" at one of our TWENTY FIVE parties? If you can't remember, be sure to check our THE Pin It Party - The Best of the Best Pinterest board. We have a surprise for you! Go here to grab a special badge I made just for you!

Are you interested in co-hosting THE Pin It Party? It is a WHOLE lot of fun and a great way to grow your Pinterest following. Go here to get more information and to reserve your spot now!
Completely Unfinished - Summer Lovey Dovey Road Trip Playlist One Organic Mama - A Robot Party What's Up with the Wilhelms - Anywhere Workout
1. Please follow the host and co-hosts on Pinterest.
2. Send out a tweet about the party! Just click here:
3. "Like" THE Pin It Party on Facebook by clicking on the button below.
4. Grab the party button above and add it to your blog's sidebar or link up party list.
5. Post 1-3 links to your blog's most "pin-able" posts from the last few weeks. (Please, no links to other parties, giveaways or shops please. If you are an ETSY shop owner, come back this weekend and link up at the Weekend Blog Block Party!)
6. Mingle! Reach out to somebody new and pin their stuff. You never know when you will meet your blogging bestie!
7. Have a FABulous day and come back next week for more Pinterest fun.
Host: Ellie @ Creative Geekery
Co-Hosts:
We will each choose our three favorite posts from the party and pin them to this party's collaborative Pinterest board: THE Pin It Party - The Best of the Best! Woot woot!


ShareThis

Related Posts Plugin for WordPress, Blogger...