Header

 photo newheader_zps66c52807.png
Image Map

Friday, June 28, 2013

A Minted Wedding: Sponsored Post

This post is sponsored by Minted.com, but as always all opinions are 100% my own.

Are you familiar with Minted?
Of course, you are.

But, did you know that Minted is a community of independent designers? Yep. 
Awesome designers from all over the world submit their designs to Minted to be printed and sold through their online store. Many of the designers wouldn't be able to have their work seen without the help of Minted.

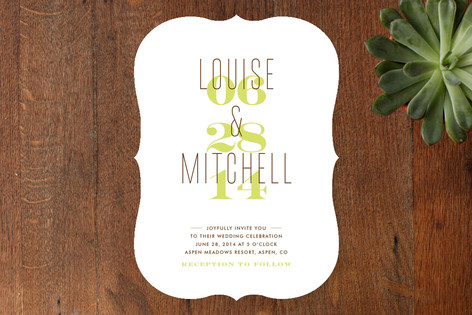
Here are a few of my favorite designs...really, just a few, there are so many that I loved, I struggled to narrow it down!

I love the vintage look 


You can choose the silhouette that you like best! Coolness!


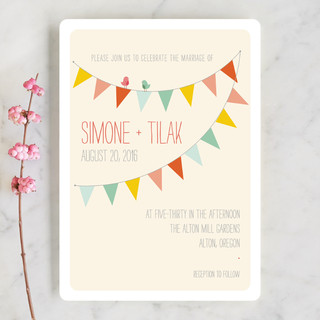
Bunting...need I say more?
There are also inspiration boards you can browse. If you love to look at weddings or are having trouble deciding on a design direction for your event, there are many to give you that spark to create an event to remember.

I love the playfulness of this design.

time flies whimsical wedding by Wondercloud Design, see more modern Minted wedding invitations


And, succulents in the bouquet! I die!

Rustic & Roses Wedding by Inkblot Paper, see more Minted


Vintage pink and aqua. Love.

Inspiration Board by Keri, see more Minted

Almost makes me want to get married all over again. 
Nah, I'm good.

But, really, the designs are lovely and you can get any samples for free. 
You really can't go wrong!

Try them out if you are planning that wedding event of the season, or any other occasion that comes up! 

Head over to Minted and see all the beautiful and fun designs. 
(Pssst: Some of the designs are sold as artwork too! Win!)

Thursday, June 27, 2013

THE Pin It Party #11

Better late than never, eh?
I was traveling all day yesterday and when I laid my head down to pillow, my eyes flew open and I realized that I had never posted THE Pin It Party!

Well, waste no more time, folks, get pinning!

Grab button for Creative Geekery
Grab the code for our button here!
<div class="http://i1286.photobucket.com/albums/a618/CreativeGeekery/PinItParty_zps8d39e394.jpg" style="width: 150px; margin: 0 auto;">
<a href="http://creativegeekery.blogspot.com" rel="nofollow">
<img src="http://i1286.photobucket.com/albums/a618/CreativeGeekery/PinItParty_zps8d39e394.jpg" alt="Creative Geekery" width="150" height="150" />
</a>
</div>


If you haven't had a chance to add the party button to your blog's link up page or sidebar, please do it today. It would ROCK our worlds. For realsies. Also, the more people who know about the party and join in, the more potentially repins for you. Win-win, right? Also, looking for a couple more co-hosts for July and August! Send Ellie an email if you are interested and she will give send you the dets!


Please be sure to send out the tweet in "rule 5"! We just added that last week and would really appreciate you taking the two seconds to do it. THANKS SO MUCH! Party time! XO


1. Follow the host and co-hosts on Pinterest.

2. Grab the party button and add it to your blog's sidebar or link up party list.

3. Post 1-3 links to your blog's most "pin-able" posts from the last few weeks. (Please, no links to other parties, giveaways or shops please. If you are an ETSY shop owner, come back this weekend and link up at the Weekend Blog Block Party!)

4. Mingle! Reach out to somebody new and pin their stuff. You never know when you will meet your blogging bestie!

5. Please send out a tweet about the party. The more people who come and link up, the more potential repins for you! Click here to send your tweet.  

6. Have a FABulous day and come back next week for more Pinterest fun. XO 


Host: Ellie @ Creative Geekery
Co-Hosts: Kristin @ One Organic Mama 
 Steph @ A Geek in Glasses 
 Kailtin @ Life's Little Mischiefs 
Karlie Mama Whimsy

We will each choose our three favorite posts from the party and pin them to this party's collaborative Pinterest board: THE Pin It Party - The Best of the Best! Woot woot! 


Sunday, June 23, 2013

ISTE 2013=Mind Blown


I have been to conferences. Lots of conferences.
THIS conference is unlike any I have ever attended.

Seriously. My mind is whirling out of control.

Take a look at these Tier 1 sponsors:

Microsoft
Samsung
Pearson
Smart

Big stuff, people. Really big stuff.

Today's keynote was brought by Jane McGonigal who, in 2010 was one of Oprah Winfrey's Most Inspiring Women in the World, and in 2010 Game Developer Magazine called her One of the 50 Most Important Game Developers. So, what I'm saying is that she's stinking awesome. 

ISTE is the International Society for Technology in Education and do so much for educators by assisting them in integrating technology into their classrooms and teaching.  They do way more than that, but that's a good starting place. 

I'm quite the tech geek.  If it has a keyboard and/or a screen, I want to touch it.  

If it involves a cloud, I want to sync.

If it involves a hack, I want to learn it.  

So, I am in heaven right about now.  


When I am not DIYing or crafting my little heart out, I have a day job. My day job involves assisting Pre-K teachers with behavior issues in their classrooms. Coming up with strategies and individualizations for children.

Another hat that I wear in my day job is training staff and teachers on the use of technology and how to get the most out of the devices that they use every day. 

But, this conference is beyond anything that I anticipated.

If you follow me on Twitter (@amyleigh1204), you may want to check out #iste2013 to learn more from many conference attendees.  

#ISTE2013 was the top trending topic on Twitter on Sunday. Yeah, it's pretty popular. With 20,000 attendees from all 50 states and 70 countries, it's the place to be for any tech geeks.

Alas, do not worry your pretty heads.  I will be posting more DIY and crafty goodness next week....and, probably more tech-ness. (That may become a regular thing around here, we will see.)

Hugs and squeezes from San Antonio, ya'll!


Wednesday, June 19, 2013

THE Pin It Party #10

It's time once again, for THE Pin It Party! Come one, come all!
Send your friends and even those who aren't your friends.
Just send 'em to link up their awesome projects!

Grab button for Creative Geekery
Grab the code for our button here!
<div class="http://i1286.photobucket.com/albums/a618/CreativeGeekery/PinItParty_zps8d39e394.jpg" style="width: 150px; margin: 0 auto;">
<a href="http://creativegeekery.blogspot.com" rel="nofollow">
<img src="http://i1286.photobucket.com/albums/a618/CreativeGeekery/PinItParty_zps8d39e394.jpg" alt="Creative Geekery" width="150" height="150" />
</a>
</div>


If you haven't had a chance to add the party button to your blog's link up page or sidebar, please do it today. It would ROCK our worlds. For realsies. Also, the more people who know about the party and join in, the more potentially repins for you. Win-win, right? Also, looking for co-hosts for July! Send Ellie an email if you are interested and she will give send you the dets!


1. Follow the host and co-hosts on Pinterest.

2. Grab the party button and add it to your blog's sidebar or link up party list.

3. Post 1-3 links to your blog's most "pin-able" posts from the last few weeks. (No links to other parties, giveaways or shops please.) 

4. Mingle! Reach out to somebody new and pin their stuff. You never know when you will meet your blogging bestie!

5. After you link up, please send out a tweet about the party (Eh hem, you can follow me on Twitter, too). The more people who come and link up, the more potential repins for you!


6. Have a FABulous day and come back next week for more Pinterest fun. XO 


Host: Ellie @ Creative Geekery
Co-Hosts: Kristin @ One Organic Mama 
 Steph @ A Geek in Glasses 
 Kailtin @ Life's Little Mischiefs 

We will each choose our three favorite posts from the party and pin them to this party's collaborative Pinterest board: THE Pin It Party - The Best of the Best! Woot woot! 


My Favorite Fonts #1


Update: If you love fonts, check out this selection of more of my favorites!
{My Favorite Fonts 2}
{My Favorite Curly Fonts}

My turn! My turn!
Everyone else is talking about their favorite fonts and I do so love them, so why not?

Here are a few of my favorites...and, they are all free for download. 
The download list is after the image. 

favorite free fonts
Trip Worth Taking's Favorite Fonts


If you notice I only got to "J" in the alphabet! I'll have another post for you soon with more of my favorites!


Tuesday, June 18, 2013

DIY Aged Artwork


If you haven't bought this:


then you should run over to The Handmade Home and download it. I'll wait..... Go on!
.
.
.
.
.
.
.
.
.
.
.
.
.
Ok, you're back! Good! 

I want to show you the project that I did this weekend, inspired by Ashley and Jamin's awesome artwork that they have created for their home. 

They are so creative and there isn't anything they have included in their book that I don't love. (Be sure to read to the end for a nice little tip!)

I have had these in my dining room since forever:

tree artwork
 And, I loved it at one time, but it isn't me anymore.
So, I set to work!

I'm pretty much a painting rebel and just do it in the kitchen....right on the counter. All those little paint drips just wipe right up! 

I used gloopy old latex paint samples that I have had for a very long time. (That's what Ashley does, too!) I poured a bunch right on the canvas.

I did this on both canvases and forgot to take a pic of the start of the large one:

Paint poured on canvas
Paint on canvas
 I spread it with my paint brush and left brush lines going all different directions.

brush strokes in paint
Brush strokes in wet paint

spreading paint on canvas
Spreading paint on canvas

I didn't want it to be perfect!

Then, I traced out my wording in pencil, once the paint was dry. (Any stray pencil marks can be erased easily.)
pencil outline on canvas
Pencil outline on canvas
First Layer of paint
Once I had my outline, I started layering paint of different colors.

layered paint to achieve aged look
Layering paint to achieve aged look

I just kept layering until I achieved the look that I wanted.

I used my fingers to smear the paint and I swished a little paint of each volor across the canvas to give it a distressed look.

Once it was complete, I aged it with Old English furniture polish.  Yes, I know that is somewhat strange, but I didn't have any stain.

DIY aged artwork
Completed aged artwork

After I looked at it for a couple of days, I decided it that it needed a little something. I added brackets to each side to fill up the canvas more.

DIY word art and arrow

I really love the way it turned out! 

I created the arrow the same way.  I freehanded the arrow and layered the paint in the same manner.

The letters aren't perfect, but I really like it.  

I have created other artwork for the house, as well.  

This "Believe" sign hangs in the kitchen and hides our internet router.

Believe wood plank artwork
Believe Artwork hiding internet router

Large handpainted "F"
The "F" was cut out by Rex and I painted the stripes and allowed each one to bleed into the next.

It really doesn't have to be perfect. As long as you love the pieces you create it IS perfect for your home.  And, I guarantee, the pieces you create will get many more comments than anything else in your home.

Now go get creative!

Now for the tip: Laura over at The Turquoise Home has a chance for you to win a copy of Handmade Walls. Head on over and enter for your chance to win!


Pssst: I am not an affiliate, nor have I been compensated for this post. It's just a great little e-book!


Linking up:
The Owl's Skull 

Thursday, June 13, 2013

Succulent Planter Project with Miracle-Gro

This is a Sponsored post written by me on behalf of Miracle-Gro for SocialSpark. All opinions are 100% mine.

Don't you want to get growing?


I love plants, but I'm not that great with them.  I have one in the living room that I have managed not to kill....yet. Ha! But, I love succulents. I just love the way they look.

Today, I stayed at home with the little guy to give him a chance to sleep late and have a day off.  He has been going to day camp every day since school got out and we all need a little break now and then. I wanted to do something fun with him, so we potted a few succulents in a small pot for the kitchen.

Here are the products that we used:

Miracle-Gro Products and plants

I purchased a few teeny tiny succulents, a pretty pot, and my Miracle-Gro products.  I used the Moisture Control Potting Mix and the Shake-n-Feed Moisture Control Plant Food. I am determined to keep these plants alive! If these were going in the ground, I would have used the LiquaFeed All Purpose Plant Food Advance Starter kit. That will be on my list when I start a garden (hopefully this fall with some winter veggies).

I had my little helper gather some rocks to go in the bottom of the pot:


I would have preferred smaller rocks, but I went with it....

Then I added the potting mix on top of the rocks and put in a smidge of the Shake-n-Feed Plant food. It only takes a little of the food, so don't get carried away!


Then I covered the food with a little more of the Moisture Control Potting Mix.

Here is my partner reading up on the latin names of the plants I had chosen:


Now, I was ready to add my plants! My excellent helper did some of the work by adding potting mix around the plants to make sure they were very secure.  Then he spritzed them with water.


Yes, we used a kitchen spoon.  We are wild and crazy like that!


It turned out really cute! I love the cactus.


I put the completed pot behind my sink in the kitchen:


Plants really do make a space happier, don't they?

The Shake-N-Feed Plant food with keep the plants nourished and the Moisture Control Potting Soil will help them retain the right amount of water that they need.  Done and done! And, since they are right behind my sink, surely I won't forget to water them occasionally.

You should check out The Gro Project to get more ideas on fun garden projects. Growing things with your kids is a lot of fun and they love to watch the plants.

Miracle Gro also has a Pinterest page with projects for every season and great ideas for your veggie gardens. (We had a veggie garden last year and didn't get to plant anything this year.  I'm thinking the Pinterest Page will be a great resource for the Fall garden!) And, there are articles galore at Miracle-Gro for anyone from beginners to experts with tips and tricks for all things plants.

Like them on Facebook and follow them on Pinterest to keep up with new products and ideas for planting.

Get planting with your kids! I promise they will have fun and you will create a memory.


Visit Sponsor's Site

Wednesday, June 12, 2013

THE Pin It Party #9

Once again, it is time for THE PIN IT PARTY!!!!!
6 fab blogs are hosting this fun linky party (yes, I include myself in the fab group), so 1 link=6x's the exposure for you. Who doesn't love that?

There was a great turn out last week, but spread the word to all your bloggy friends and send them over to link up. I know there are many more out there who could use a little lift to their re-pin numbers! Are you a member of a blogging Facebook group? We would be totally stoked if you posted a link to the party there. Oh, and don't forget to tweet that you linked up!

Now, on with the fun stuff......

Grab button for Creative Geekery
Grab the code for our button here!
<div class="http://i1286.photobucket.com/albums/a618/CreativeGeekery/PinItParty_zps8d39e394.jpg" style="width: 150px; margin: 0 auto;">
<a href="http://creativegeekery.blogspot.com" rel="nofollow">
<img src="http://i1286.photobucket.com/albums/a618/CreativeGeekery/PinItParty_zps8d39e394.jpg" alt="Creative Geekery" width="150" height="150" />
</a>
</div>


If you haven't had a chance to add the party button to your blog's link up page or sidebar, please do it today. It would ROCK our worlds. For realsies. Also, the more people who know about the party and join in, the more potentially repins for you. Win-win, right? 

And now, on to the partaaaay! 
XO, ellie

1. Follow the host and co-hosts on Pinterest.

2. Grab the party button and add it to your blog's sidebar or link up party list.

3. Post 1-3 links to your blog's most "pin-able" posts from the last few weeks. (No links to other parties, giveaways or shops please. If you are an Etsy shop owner, come back this weekend and link up at the Weekend Blog Block Party!)

4. Mingle! Reach out to somebody new and pin their stuff. You never know when you will meet your blogging bestie!

5. After you link up, please send out a tweet about the party. The more people who come and link up, the more potential repins for you!

6. Have a FABulous day and come back next week for more Pinterest fun. XO 


Host: Ellie @ Creative Geekery
Co-Hosts: Kristin @ One Organic Mama 
 Steph @ A Geek in Glasses 
 Shelly @ Dolen Diaries 
 Kailtin @ Life's Little Mischiefs 

We will each choose our three favorite posts from the party and pin them to this party's collaborative Pinterest board: THE Pin It Party - The Best of the Best! Woot woot! 


{BTW, if you are interested in co-hosting, please shoot me an email.}


DIY Painted Jute Rug

Hey, my friends!
Today I'm finally sharing my painted rug with you.

This is a project that was a little afraid to tackle, but it was totally worth it.  

I snagged a large jute rug at a consignment shop for 60 bucks back in the fall. I knew it would be perfect to go under our new to us dining table when we completed our kitchen renovation. 

The table is an antique game table with slide outs on each end and I had found these modern chairs at a second hand shop for 10 dollars each. (I'm pretty sure the chairs were in a cafeteria at a local university. Ha!)


Then we decided to get a sweet puppy. Well, she's not actually a puppy. Dot is about 4-5 years old and we got her from a local animal rescue.


This was a last minute decision to insert this photo, so it's not the best. 
Yes, she looks sad most of the time but it makes her so cute.

As many of you know, when you bring a new dog into a home the world is their toilet. Which, unfortunately, included my jute rug. 


I had already started painting when I remembered to take a pic of the ginormous stain!

My sweet hubby, Rex, wanted to help out and clean said stain by pouring hot water on it.  (I don't know why or why he thought that would be a good idea.) The stain just grew. It started out about half this size.

So, in comes the paint and stencils.
It went really fast and was so easy.

I used some satin paint that I had a sample of from Lowes and these:


I scored these at Michael's with a 50% off coupon!

So the rug went from gross to great!


There are a couple of places that you can still barely see the darker area of the stain, but it really turned out awesome! (The corner embellishment is covering the edge of the stain in that corner above.)

Have you ever painted a rug? What kind of paint did you use and where did you put your rug?

Linking up:


Monday, June 10, 2013

Peeking @ Pinterest #3: Simply Dream & Create


Today, I am showing off one of the boards that belongs to Stephanie at Simply Dream and Create.
She is a cool lady and is always up to something crafty.

I am in love with these Paper Dahlias that she created.

Paper Dahlias from Simply Dream and Create
Paper Dahlias

She recently completed this blue tinted and netted case. She did a great job!

Tinted and netted vase from Simply Dream and Create
Tinted and netted vase

This cute little roll up tote that she sewed turned out great!

Roll up tote bag from Simply Dream and Create
Roll Up Tote Bag

I don't wear head bands, but this wide fabric headband with ribbon ties is really cute.

Fabric Headband from simply Dream and Create
Fabric HeadBand

I really have to learn to sew.  I can sew a pretty straight line, but not much else.  It's enough to make pillow covers and that's about it.  My mom and sisters got all the sewing genes, I guess!

Head on over to follow Stephanie's Pinterest boards. She creates really great things and is always pinning more!

ShareThis

Related Posts Plugin for WordPress, Blogger...